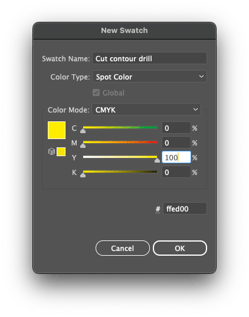
How to set up your artwork to show drill hole positioning.

How to Add Drill Holes to Your Rigid Board Print
Adding pre-drilled holes to your rigid board is simple! Just follow these friendly steps to ensure your design is ready to go:
Step 1: Create the Spot Colour for Drill Holes
- Open the Swatches panel in your design software.
- Create a new spot colour and name it "Cut contour drill"
- "Cut contour drill" is case sensitive.
- Set the colour to 100% Yellow.
- Ensure the line weight is 0.25pt.
Important: All paths should be strokes only (no fill).

Step 2: Add Drill Hole Locations to Your Artwork
- Include the drill hole placements directly on your artwork before uploading it.
- Use a 5mm diameter circle to indicate where each drill hole should go.
- These circles will be printed on your design and act as guides for our operators.

Step 3: Position the Drill Holes Correctly
- Place the centre of each drill hole at least 25mm from the edge of the board.
- Make sure the path for each drill hole is exactly 5mm in diameter.

Step 4: Decide on the Number and Placement of Holes
- You can add as many or as few holes as you need, depending on where you’ll be placing the board.
- Ensure there’s enough space between the drill holes and the edges of the board to prevent damage during hanging or drilling.
Step 5: Export Your File
Review your design and, once satisfied, export your file as a PDF for printing. We recommend using PDF/X-4:2010 for the best results, as it maintains the spot colour information needed for cutting